How to Make Perfect Caramel Candy: The Complete Guide to Rich, Chewy Homemade Caramels
Recipe Rundown
Taste: Intensely buttery with deep caramel notes and just the right amount of sea salt
Texture: Soft, chewy, and perfectly yielding – never tough or sticky
Difficulty: Intermediate – requires attention but completely achievable with proper technique
Why You’ll Master This: Professional candy-making secrets revealed step-by-step, plus foolproof troubleshooting for guaranteed success
Making caramel candy from scratch transforms your kitchen into a professional confectionery. These aren’t the hard, overly sweet store-bought squares – these are luxuriously soft, deeply flavored caramels that melt perfectly on your tongue.
After years of perfecting this technique in professional kitchens, I’ve discovered the exact temperature control, timing, and ingredient ratios that separate amateur attempts from bakery-quality results. The secret isn’t just following a recipe – it’s understanding the science behind sugar crystallization and how to manipulate it for the perfect chew.
This caramel candy recipe produces approximately 64 individual pieces and makes an impressive gift that rivals any high-end candy shop. More importantly, once you master this technique, you’ll never buy caramels again.
The Science Behind Perfect Caramel Candy
What Makes Caramel Candy Different from Caramel Sauce?
The fundamental difference lies in temperature and sugar concentration. Caramel candy reaches the firm-ball stage at 245°–249°F (118–121°C), where the syrup contains 87–91% sugar. This high sugar concentration creates the characteristic chewy texture when cooled.
Caramel sauce, by contrast, stops at a much lower temperature, maintaining more moisture for that pourable consistency. Understanding this distinction is crucial for success.
The Maillard Reaction: Where Flavor Develops
True caramel flavor develops through the Maillard reaction – the chemical process where sugars and proteins brown under heat. This creates hundreds of complex flavor compounds that give caramel its distinctive taste beyond simple sweetness.
Why Temperature Precision Matters
The firm ball stage forms at 245 degrees Fahrenheit, perfect for making creamy caramel candies. Even 5 degrees makes the difference between perfectly chewy and disappointingly soft or unpleasantly hard.
Essential Ingredients for Superior Caramel Candy
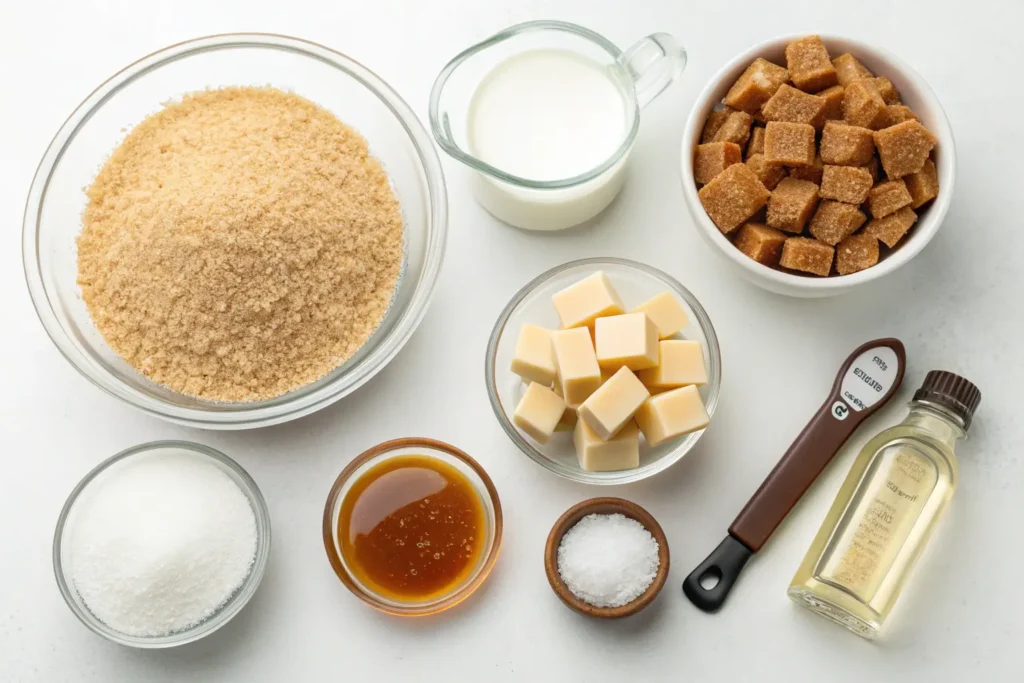
The Sugar Foundation
- 1½ cups (300g) granulated sugar – Provides the caramel base
- ¾ cup (165g) packed light brown sugar – Adds molasses depth and moisture
- ¼ cup light corn syrup – Prevents crystallization and ensures smooth texture
The Richness Components
- 1 cup (240ml) heavy cream (35% fat minimum) – Creates luxurious mouthfeel
- ½ cup (113g) unsalted European-style butter – Higher fat content = better flavor
- 1 can (14oz) sweetened condensed milk – Provides creaminess and helps achieve proper texture
Flavor Enhancers
- 2 teaspoons pure vanilla extract – Must be pure, not imitation
- 1½ teaspoons flaky sea salt – Maldon or similar, plus extra for finishing
- Optional: 2 tablespoons bourbon or rum – For adult versions
Professional Equipment for Caramel Candy Success
Essential Tools
- Heavy-bottomed 3-quart saucepan – Even heat distribution prevents burning
- Digital candy thermometer – Accuracy is non-negotiable for proper texture
- Silicone spatula – Heat-resistant and won’t scratch your pan
- 8×8 inch pan – Lines with parchment for easy removal
Quality Considerations
The saucepan material matters enormously. Thin aluminum pans create hot spots that burn sugar before it properly caramelizes. Invest in heavy-bottomed stainless steel or enameled cast iron.
Step-by-Step: Mastering Caramel Candy Technique
Preparation Phase (5 minutes)
- Line your 8×8 pan with parchment paper, leaving overhang for easy removal
- Butter the parchment lightly to prevent sticking
- Set up your workspace with all ingredients measured and within reach
- Attach thermometer to pan side, ensuring it doesn’t touch the bottom
The Critical Cooking Phase (25-30 minutes)
Stage 1: Building the Base (8-10 minutes)
- Combine both sugars, corn syrup, and condensed milk in your heavy saucepan
- Stir until just combined – overmixing incorporates air bubbles
- Cook over medium heat, stirring constantly with figure-8 motions
- Watch for the mixture to begin bubbling enthusiastically
Stage 2: The Caramelization Window (15-20 minutes)
- Continue cooking, stirring constantly without stopping
- The mixture will progress through color changes: cream → light tan → golden → deep amber
- Monitor temperature closely as it approaches 240°F
- Reduce heat slightly if temperature rises too quickly
Stage 3: Achieving the Firm Ball Stage (2-3 minutes)
- At 244–248°F, the syrup forms flat balls when pressed
- Perform the ice water test: drop ½ teaspoon into ice water
- The caramel is ready when it feels pretty firm and pliable when molded into a ball
- Remove from heat immediately upon reaching 246°F
Finishing Touches (3 minutes)
- Remove from heat and let bubbling subside (30 seconds)
- Stir in butter until completely melted and incorporated
- Add vanilla and salt with final gentle stirs
- Pour immediately into prepared pan, working quickly but carefully
Advanced Techniques for Professional Results
The Altitude Adjustment Rule
For every 1,000 feet above sea level, reduce target temperature by 2°F. At 3,000 feet, aim for 240°F instead of 246°F.
Humidity Considerations
High humidity affects caramel texture. On very humid days, cook 2-3 degrees higher than normal to compensate for moisture absorption.
Color vs. Temperature Priority
Always prioritize temperature over color. Proper texture comes from precise temperature, while color can vary based on your sugar sources and cooking speed.
Troubleshooting Common Caramel Candy Problems
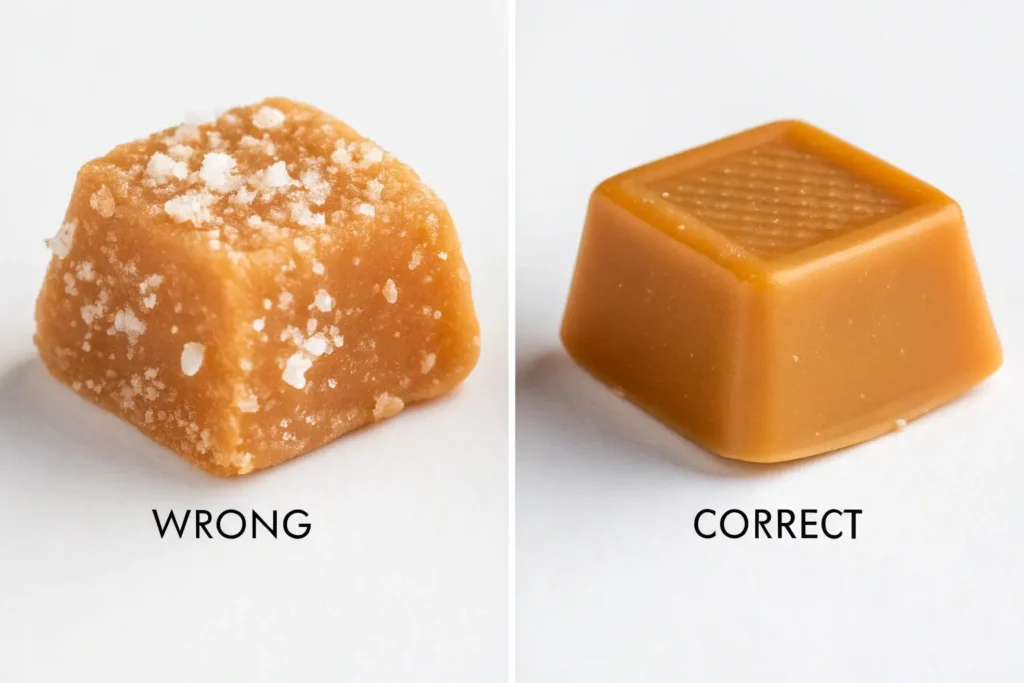
Problem: Grainy, Crystallized Texture
Cause: Sugar crystallization during cooking
Prevention: Avoid stirring once mixture reaches 230°F; use corn syrup as directed
Fix: If it happens, add 2 tablespoons hot water and reheat to dissolve crystals
Problem: Too Soft or Sticky
Cause: Undercooked – didn’t reach proper temperature
Prevention: Trust your thermometer over visual cues
Fix: Return to pan, reheat to correct temperature
Problem: Too Hard or Brittle
Cause: Overcooked beyond firm ball stage
Prevention: Remove from heat immediately at 246°F
Fix: Unfortunately, this batch cannot be salvaged – start over
Problem: Separated or Oily Appearance
Cause: Fat separated due to temperature shock
Prevention: Let mixture cool slightly before adding butter
Fix: Vigorous whisking while still warm usually re-emulsifies
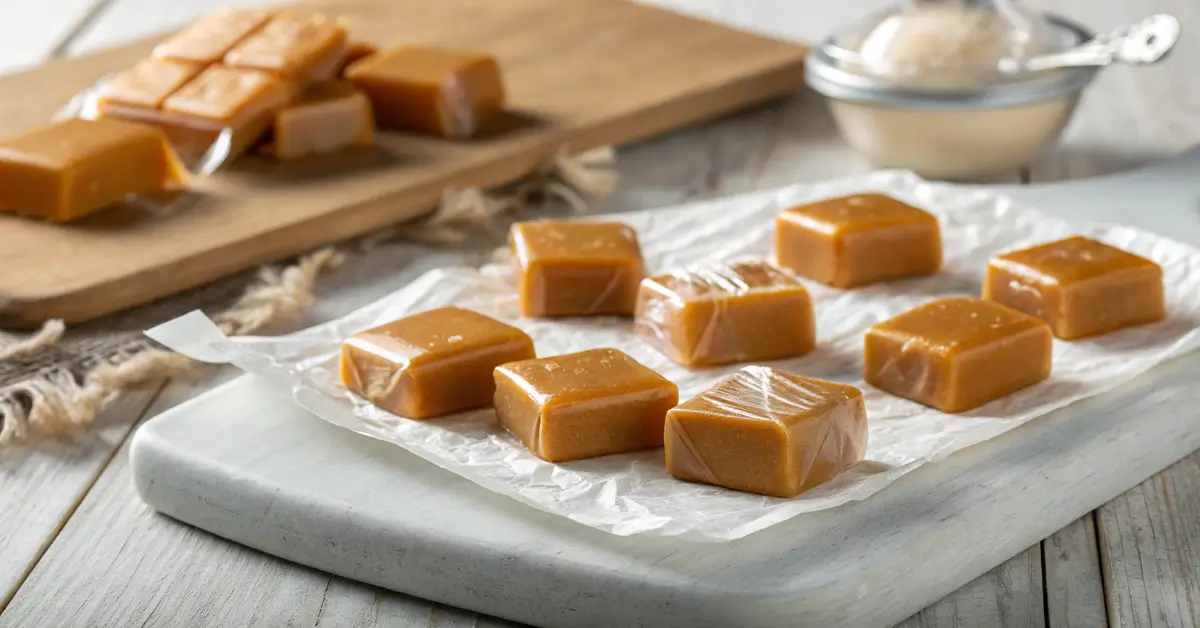
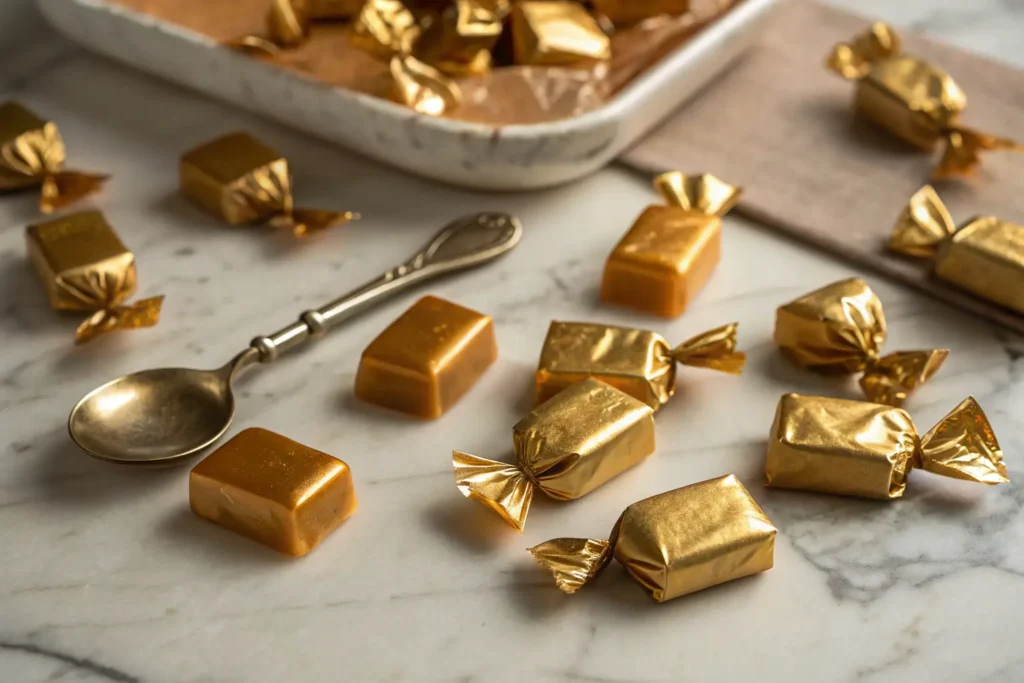
Cutting and Wrapping Like a Professional
Perfect Cutting Technique
- Wait for complete cooling – 4-6 hours at room temperature
- Use a sharp, heavy knife dipped in warm water between cuts
- Cut into 8 strips one direction, then 8 perpendicular for 64 pieces
- Clean knife frequently to prevent dragging and uneven cuts
Professional Wrapping Method
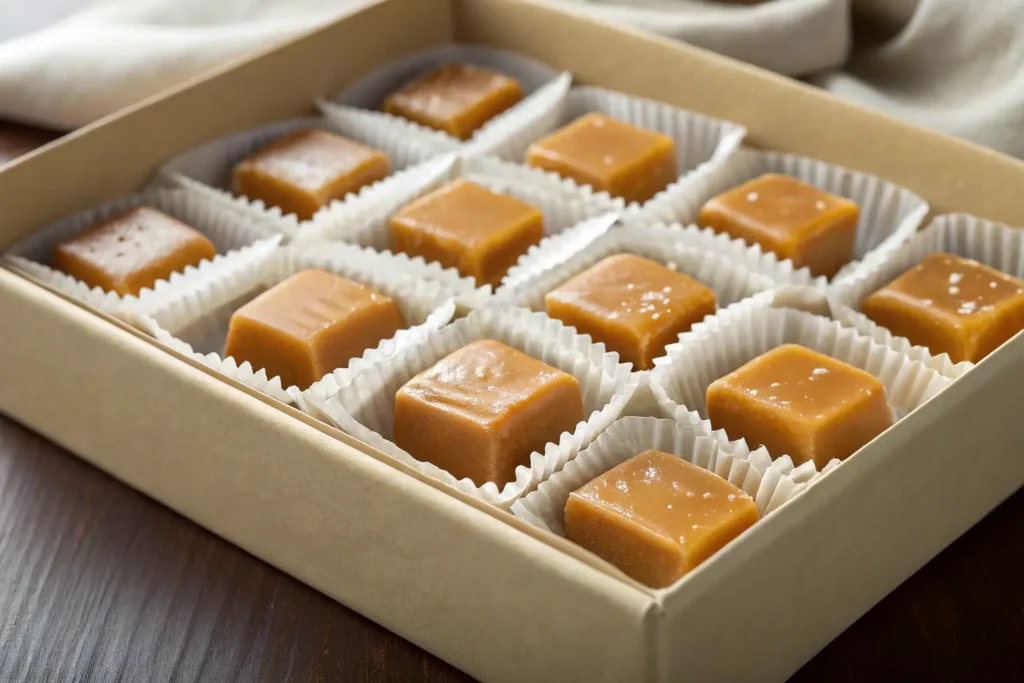
Individual wrapping in 4×4 inch parchment squares not only looks professional but prevents sticking. Twist ends like traditional candy wrapping, or use small cellophane bags for gift-giving.
Storage and Shelf Life
Optimal Storage Conditions
Store wrapped caramels in an airtight container at room temperature for up to 3 weeks. Layer between parchment paper to prevent sticking.
Refrigeration Guidelines
Refrigeration extends shelf life to 2 months but creates firmer texture. Allow to return to room temperature before serving for optimal chewiness.
Freezing Instructions
Properly wrapped caramels freeze beautifully for up to 6 months. Individual wrapping prevents freezer burn and makes portioning easy.
Creative Variations and Flavor Combinations
Bourbon Vanilla Caramels
Replace vanilla extract with 2 tablespoons good bourbon added after removing from heat. The alcohol cooks off, leaving sophisticated flavor depth.
Espresso Caramels
Dissolve 2 tablespoons instant espresso powder in the cream before adding to sugar mixture. Creates intense coffee notes that pair beautifully with the caramel sweetness.
Sea Salt Caramel Squares
Increase salt to 2 teaspoons in the mixture, then sprinkle flaky salt on top before cutting. This restaurant-quality combination elevates the candy to gourmet status.
The Gift-Giving Advantage
Homemade caramel candy makes an impressive gift that demonstrates skill and thoughtfulness. Package in clear cellophane bags with ribbon, or arrange in decorative tins for holidays.
The cost per piece is significantly lower than artisanal candy shops, while the quality often exceeds expensive store-bought versions. A single batch provides gifts for multiple recipients.
Scaling the Recipe Successfully
This recipe doubles beautifully for larger batches, but requires a larger, heavier pan and extended cooking time. Triple batches become unwieldy – better to make multiple double batches.
When scaling down, halve all ingredients but watch temperatures closely as smaller batches reach target temperature more quickly.
Professional Tips for Consistent Results
Temperature Calibration
Test your thermometer in boiling water – it should read exactly 212°F at sea level. Adjust your target temperatures accordingly if there’s variation.
Timing Consistency
Start to finish, this recipe takes 45-60 minutes including setup and cooling. Plan accordingly and don’t rush the process.
Weather Awareness
Avoid making caramels on extremely humid days unless you have climate-controlled workspace. Humidity affects both cooking and storage.
Serving Suggestions and Pairings
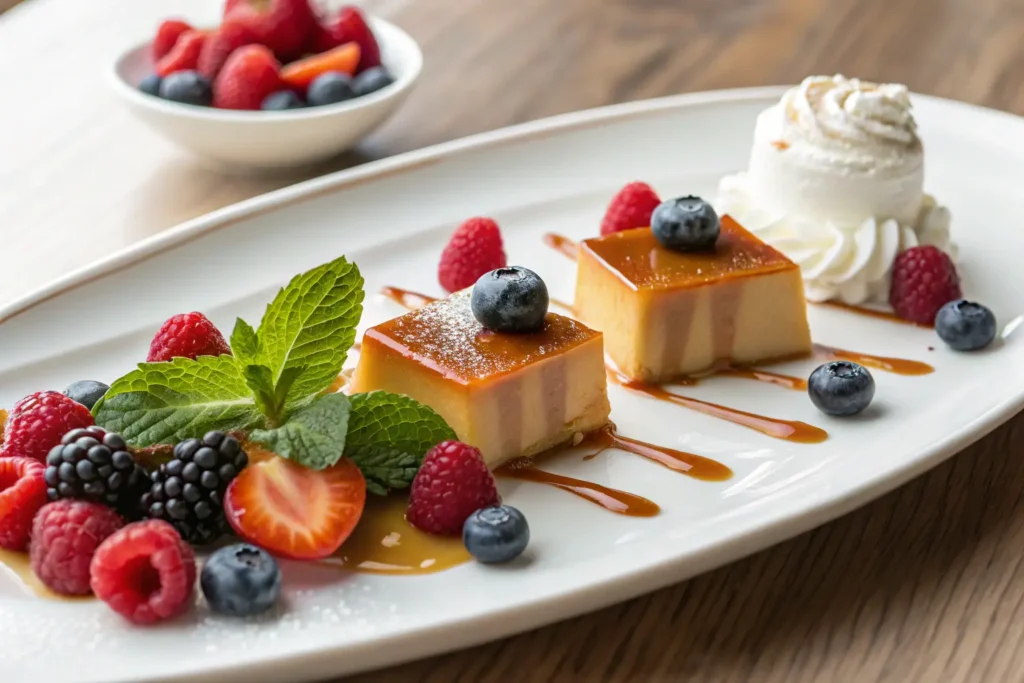
Elegant Presentations
- Arrange on dessert plates with fresh berries and whipped cream
- Chop and fold into vanilla ice cream for homemade caramel swirl
- Melt down for sauce to drizzle over cheesecake or tarts
Wine and Beverage Pairings
- Port or sherry complements the rich sweetness
- Bold red wines create interesting contrast
- Coffee or espresso enhances the caramel notes
The Economics of Homemade vs. Store-Bought
Premium caramel candies retail for $2-4 per piece at specialty shops. This recipe produces 64 pieces for approximately $12 in ingredients – a 75% cost savings while achieving superior quality and customization.
Conclusion: Your Caramel Candy Mastery Journey
Perfect caramel candy requires patience, precision, and practice, but the results justify every moment of attention. Unlike many candies that rely on artificial flavors and preservatives, these caramels showcase pure, developed flavors that improve with technique.
The satisfaction of creating professional-quality confections in your own kitchen, combined with the joy of sharing them with others, makes this skill invaluable for any serious home cook.
Perfect Caramel Candy Recipe
Ingredients
- 1½ cups (300g) granulated sugar
- ¾ cup (165g) packed light brown sugar
- ¼ cup light corn syrup
- 1 cup (240ml) heavy cream
- ½ cup (113g) unsalted butter
- 1 can (14oz) sweetened condensed milk
- 2 teaspoons pure vanilla extract
- 1½ teaspoons flaky sea salt
Instructions
- Line 8×8 pan with buttered parchment paper
- Combine sugars, corn syrup, and condensed milk in heavy 3-quart saucepan
- Cook over medium heat, stirring constantly, until mixture reaches 246°F (firm ball stage)
- Remove from heat, stir in butter until melted
- Add vanilla and salt, stir gently to combine
- Pour into prepared pan immediately
- Cool completely (4-6 hours) before cutting into squares
- Wrap individually in parchment paper for storage
Recipe Notes
- Cooking time varies 25-35 minutes depending on pan and heat level
- Use candy thermometer for accuracy – visual cues alone aren’t reliable
- Store wrapped caramels at room temperature up to 3 weeks
- Recipe doubles successfully with larger pan and extended cooking time
Share your caramel candy creations with #PerfectCaramels – we love seeing your results!
This recipe was developed and tested multiple times to ensure consistent, professional results. For questions or troubleshooting, contact us directly.
| Pin to Pinterest | Share on Facebook
Follow us On : Facebook and Pinterest