Lazy Cat Cake Recipe (Viral No-Bake Chocolate Cake)
If you have been scrolling TikTok lately, chances are you have already seen the lazy cat cake taking over dessert feeds. This lazy cat cake recipe is exactly what it promises: incredibly easy, totally satisfying, and impossible to mess up. No oven, no complicated techniques, and no fancy ingredients. Just a creamy chocolate base, a tangy cream cheese frosting layer, and a crunchy cereal topping that makes every bite addictive.
It comes together in about twenty minutes of active time, then chills in the fridge until firm. It is the kind of dessert you can throw together on a weeknight, serve at a party, or make just because you want something chocolatey without turning on the oven. We will walk you through every step , plus a few tips to get the texture just right.
Why You Will Love This Recipe
- No oven required: Perfect for hot days or small kitchens or small kitchens.
- Minimal ingredients: Pantry staples plus cream cheese and cereal.
- Viral texture: Creamy, fudgy base with a crunchy crown that everyone obsesses over .
- Make-ahead friendly: It actually tastes better after a few hours in the fridge.
- Beginner-proof: You literally cannot over-bake or under-bake this dessert.
What Is Lazy Cat Cake?
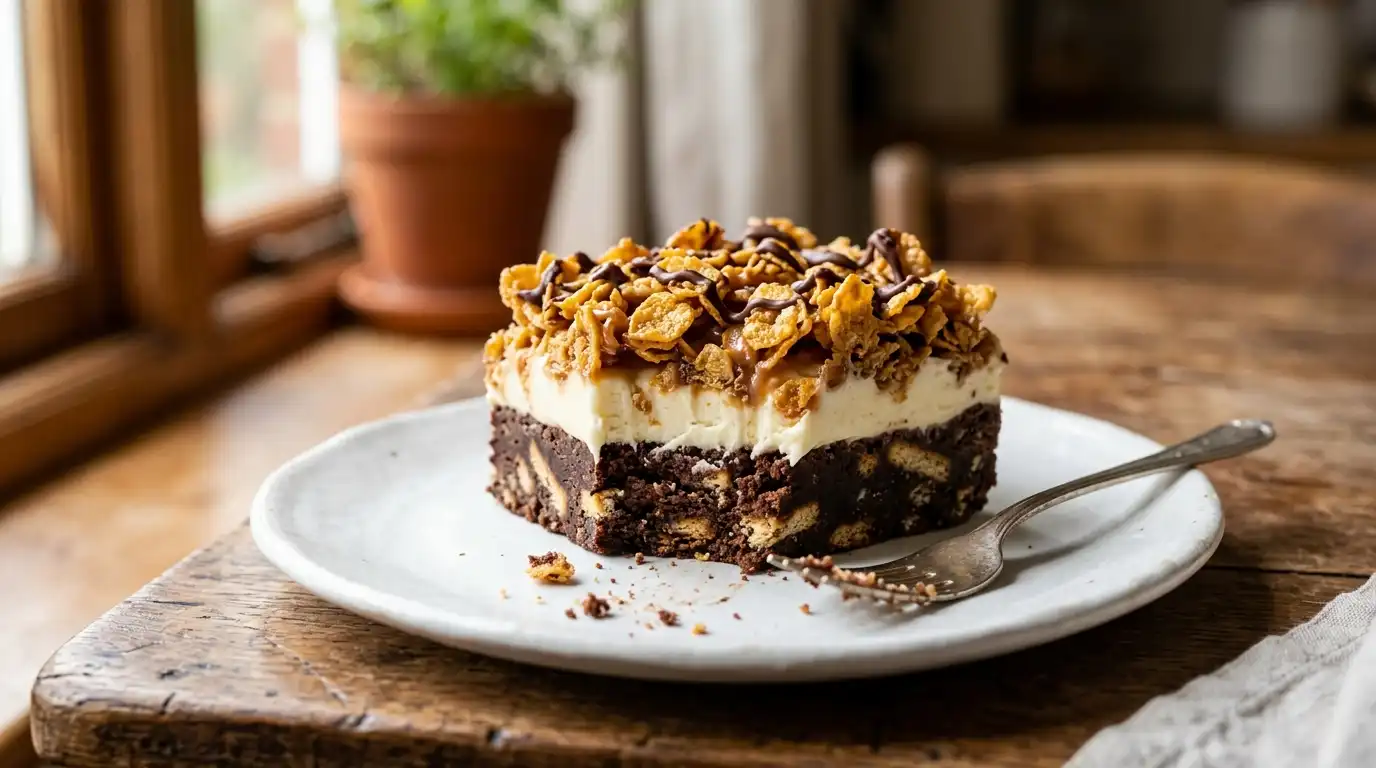
The lazy cat cake is a no-bake layered dessert that started circulating on TikTok and Instagram under a few different names. The base is usually a mixture of crushed chocolate cookies or biscuits, cocoa powder, milk, and sometimes melted chocolate, pressed into a pan and chilled until firm. On top goes a fluffy cream cheese frosting, similar to what you would find on a classic carrot cake. The finishing touch is a generous layer of crunchy cereal, Corn Flakes, or cookie crumbs that give this dessert its signature crisp texture.
Some versions add coffee for depth, others swap the frosting for whipped ganache, but the formula stays the same stays the same: chocolate, cream, crunch, chill.
Ingredients You Will Need
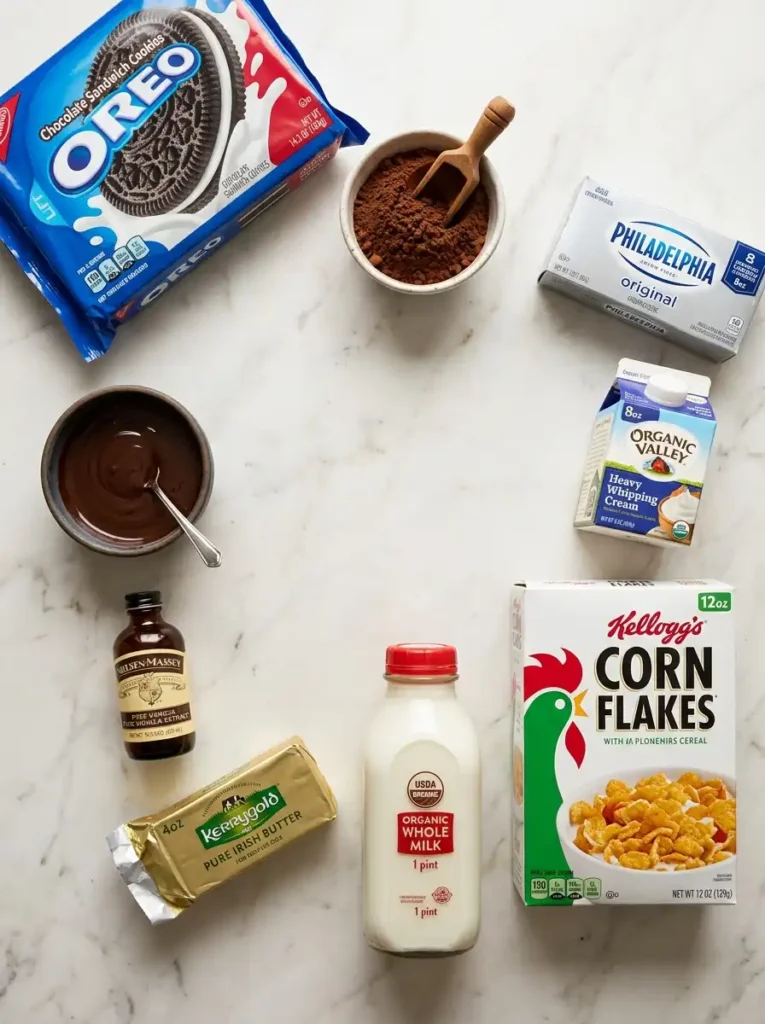
These are supermarket staples. The quality of your cocoa and chocolate matters here since there is no baking to hide behind since there is no baking to hide behind.
For the Chocolate Base
- 300g chocolate cookies or digestive biscuits (about 2 1/2 cups crushed)
- 3 tablespoons unsweetened cocoa powder
- 100g dark chocolate, melted (or milk chocolate if you prefer sweeter)
- 120ml whole milk (1/2 cup), warm
- 2 tablespoons unsalted butter, melted
- 1 teaspoon vanilla extract
- Pinch of salt
For the Cream Cheese Frosting
- 200g cream cheese, softened (about 7 oz, not light)
- 100g powdered sugar (about 3/4 cup)
- 1 teaspoon vanilla extract
- 120ml heavy cream (1/2 cup), cold
For the Crunchy Topping
- 1 1/2 cups Corn Flakes or crispy rice cereal, lightly crushed
- 2 tablespoons melted butter
- 1 tablespoon sugar (optional, for extra caramelized crunch)
How to Make This Lazy Cat Cake
1. Prepare the Pan
Line an 8×8-inch (20x20cm) square pan with parchment paper, leaving overhang on two sides for easy lifting. This is not optional; the overhang is what lets you pull the whole cake out cleanly for slicing.
2. Make the Chocolate Base
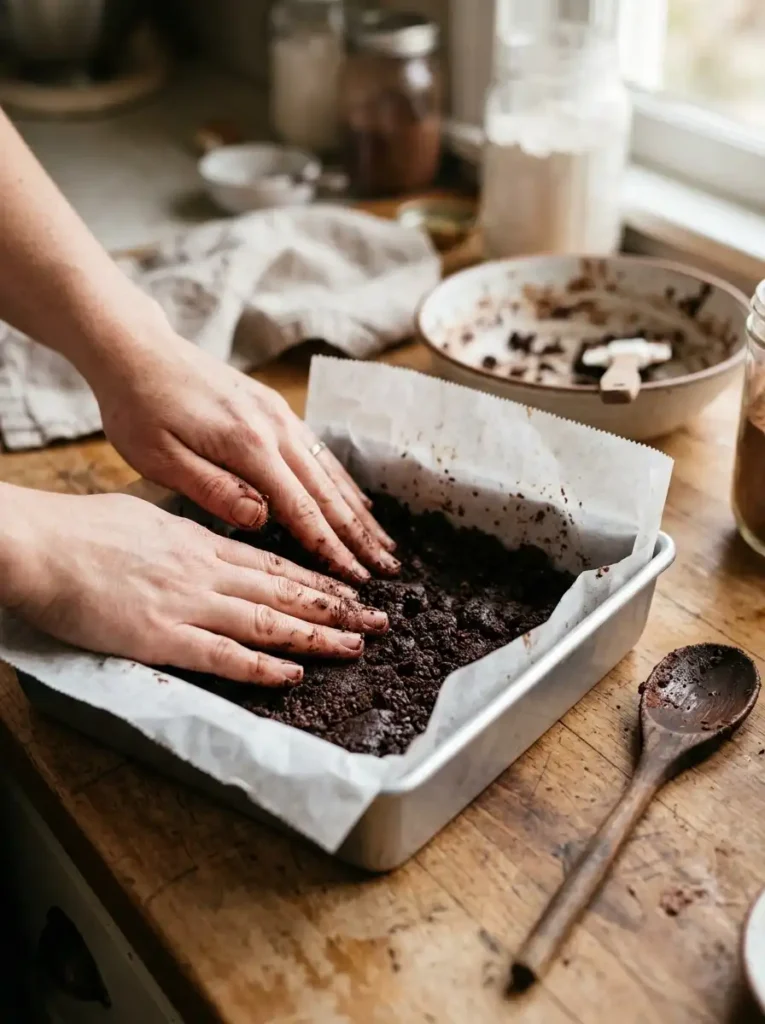
Crush the cookies into fine crumbs using a food processor or by placing them in a zip-top bag and rolling with a pin. You want mostly fine powder with a few larger bits for texture. Transfer to a large bowl.
Add the cocoa powder and pinch of salt to the crumbs and stir to combine. Pour in the melted chocolate, warm milk, melted butter, and vanilla extract. Mix vigorously with a spatula or wooden spoon until the mixture looks like thick, dark dough. It should be moist and sticky but not runny. If it feels too dry, add a splash more milk, one tablespoon at a time.
3. Press into the Pan
Scrape the chocolate mixture into your prepared pan. Use the back of a spoon or the bottom of a measuring cup to press it down firmly and evenly into one compact layer. The firmer you press now, the cleaner your slices will be later . Set aside while you make the frosting.
4. Make the Cream Cheese Frosting
In a medium bowl, beat the softened cream cheese, powdered sugar, and vanilla extract with a hand mixer (or whisk) until smooth and fluffy, about 2 minutes. In a separate bowl, whip the cold heavy cream to soft peaks. Gently fold the whipped cream into the cream cheese mixture in two additions. Do not overmix; you want the frosting light and airy for the perfect layered texture.
5. Spread the Frosting
Dollop the frosting over the chocolate base and spread it into an even layer all the way to the edges. An offset spatula makes this easier, but the back of a spoon works fine. Try not to drag crumbs from the base into the frosting layer.
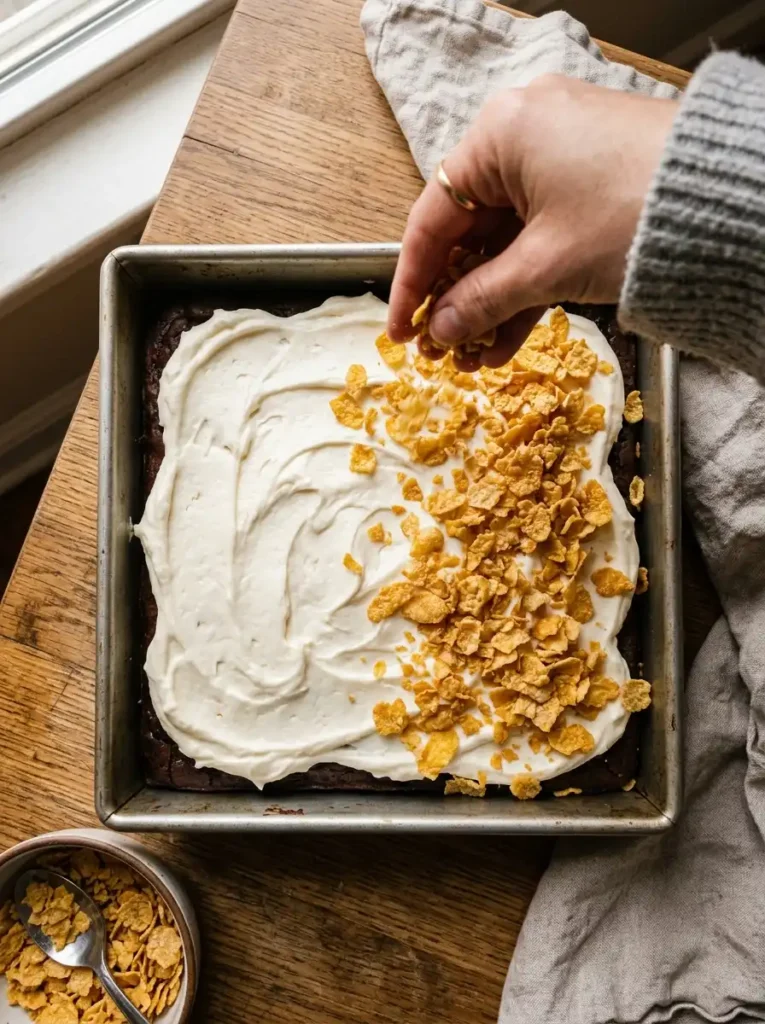
6. Add the Crunchy Topping
Mix the crushed cereal with the melted butter (and sugar if using) in a small bowl until evenly coated. Scatter this mixture generously over the top of the frosting and press down very gently so it adheres. The topping should cover the surface completely; this is not the place to be stingy — go bold with the crunch.
7. Chill Until Firm
Cover the pan tightly with plastic wrap and refrigerate for at least 4 hours, preferably overnight. The cake needs time to firm up so you can slice it cleanly. Do not rush this step. A properly chilled cake will slice.
into neat squares with distinct layers.
8. Slice and Serve
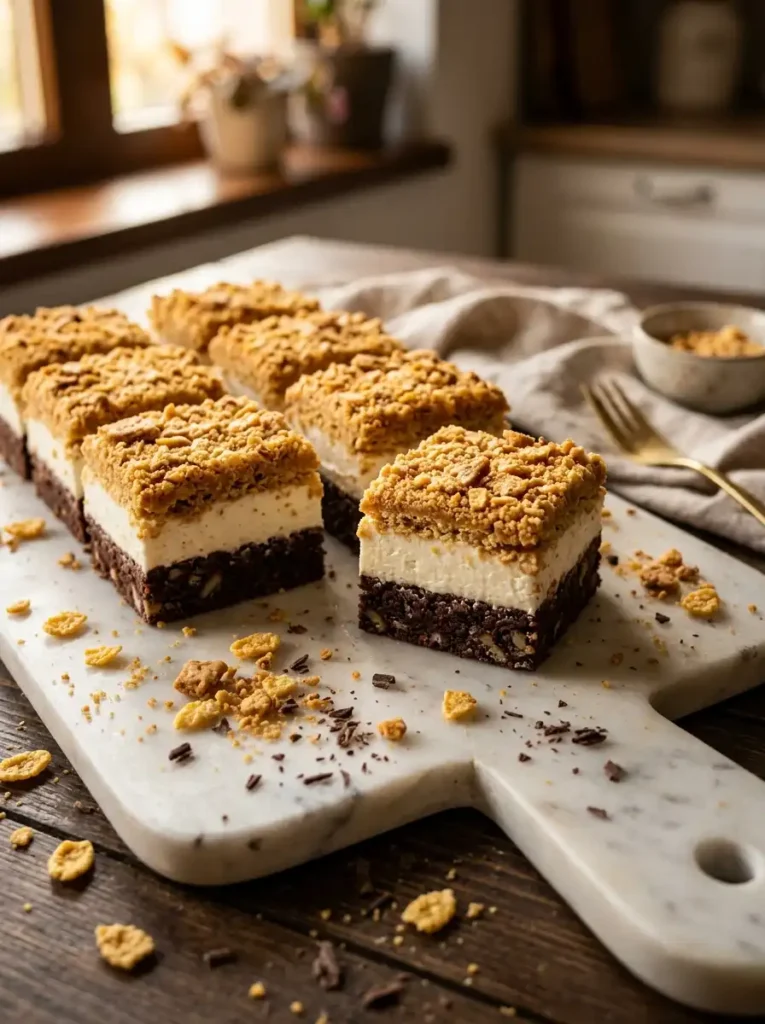
Use the parchment overhang to lift the cake out of the pan and onto a cutting board. Run a large sharp knife under hot water, wipe it dry, and slice into squares. Clean the knife between cuts for the neatest presentation. Serve cold for the best texture and flavor.
Tips for the Best Results
- Use full-fat cream cheese: Light or spreadable versions will make the frosting too soft and prone to weeping.
- Crush cereal just before topping: If you crush it too far ahead, it can soften from humidity. Keep it loose and crunchy.
- Make it coffee-flavored: Replace 2 tablespoons of the milk with strong cooled espresso for a delicious mocha twist.
- Swap the crumbs: Graham crackers, Golden Oreos, or even chocolate chip cookies work as the base. Adjust sugar if needed.
- Go gluten-free: Use certified gluten-free cookies and cereal. The rest of the dessert is naturally gluten-free.
- Freeze for longer storage: Wrap individual squares in plastic and freeze for up to 1 month. Thaw in the fridge for 30 minutes before eating.
How to Store This Cake
Keep it covered in the refrigerator for up to 4 days. The cereal topping will gradually soften from the moisture below, so if you need it extra crunchy for serving, reserve some topping and sprinkle it on just before you plate. Do not leave this cake at room temperature for more than 30 minutes, especially in warm weather, or the frosting will loosen.

Frequently Asked Questions About This Lazy Cat Cake Recipe
Can I make this lazy cat cake recipe without cream cheese?
Yes. You can replace the cream cheese frosting with a simple whipped ganache (equal parts chocolate and heavy cream, melted and cooled, then whipped) or even a thick layer of sweetened whipped cream. The texture will be different but still delicious in this lazy cat cake recipe.
Why is my lazy cat cake recipe too soft to slice?
It almost certainly needs more chilling time. This is a fridge-set dessert, not a baked cake, so the structure comes from cold temperature and the firming of the chocolate and cream cheese. Give this lazy cat cake recipe at least 4 hours, or overnight if possible.
Can I use a different cereal for the topping in this lazy cat cake recipe?
Absolutely. Crushed honeycomb cereal, puffed rice, or even toasted shredded coconut work beautifully in this lazy cat cake recipe. Anything that stays crunchy against moisture is ideal.
Is lazy cat cake the same as chocolate lazy cake?
Very similar. The lazy cat cake recipe is basically a dressed-up, viral-era version of the classic no-bake chocolate biscuit cake or chocolate salami, with the addition of a cream cheese layer and crunchy cereal topping that makes it more photogenic for social media.
Can I double this lazy cat cake recipe?
Yes. Use a 9×13-inch pan and increase chilling time by about an hour. This lazy cat cake recipe is a great dessert for potlucks and parties because it feeds a crowd and travels well.
More Viral Desserts to Try
If this easy lazy cat cake recipe got you excited about no-bake trends, here are more viral recipes from our kitchen:
- Viral Baking Trends 2026 — Our complete guide to the biggest TikTok and Pinterest desserts this year, from sourdough focaccia to Dubai chocolate brownies.
- Dubai Chocolate Brownies — Fudgy brownies layered with pistachio cream and crispy kataifi.
- Strawberry Crunch Cake — Nostalgic layered cake with a crunchy Golden Oreo crumb coating.
- Matcha Tiramisu — No-bake, earthy, and creamy with vivid green layers.
Final Thoughts on This Lazy Cat Cake Recipe
This lazy cat cake recipe is proof that the best desserts do not always need an oven, a stand mixer, or a pastry degree. It is unapologetically easy, deeply chocolatey, and textured in all the right ways. Whether you are making it because you saw it on TikTok or because you need a reliable last-minute dessert, this lazy cat cake recipe delivers.
If you try this lazy cat cake recipe, let us know what cereal topping you chose in the comments. And if you are chasing more viral lazy cat cake style trends, do not miss our full viral baking trends 2026 guide for the recipes everyone is searching for right now.
Lazy Cat Cake Recipe (Viral No-Bake Chocolate Cake)
Ingredients
Equipment
Method
- Line an 8×8-inch square pan with parchment paper, leaving overhang on two sides for easy lifting.
- Crush chocolate cookies into fine crumbs. Mix with cocoa powder and salt. Add melted chocolate, warm milk, melted butter, and vanilla. Stir until thick sticky dough forms.
- Press chocolate mixture firmly into prepared pan into one even compact layer. Set aside.
- Beat softened cream cheese, powdered sugar, and vanilla until smooth and fluffy, about 2 minutes.
- In separate bowl, whip cold heavy cream to soft peaks. Gently fold whipped cream into cream cheese mixture in two additions.
- Spread frosting evenly over chocolate base all the way to edges.
- Mix crushed cereal with melted butter and optional sugar. Scatter generously over frosting and press gently to adhere.
- Cover tightly with plastic wrap. Refrigerate at least 4 hours, preferably overnight, until firm.
- Lift cake from pan using parchment overhang. Run sharp knife under hot water, wipe dry, and slice into clean squares. Serve cold.
Notes
• Use full-fat cream cheese (not light/spreadable) so frosting firms up properly.
• Crush cereal just before topping so it stays crunchy.
• For mocha version: replace 2 tbsp milk with strong cooled espresso.
• Gluten-free: use certified GF cookies and cereal.
• Make ahead: wrap individual squares and freeze up to 1 month. Thaw in fridge 30 min before eating.
• Store covered in refrigerator up to 4 days.