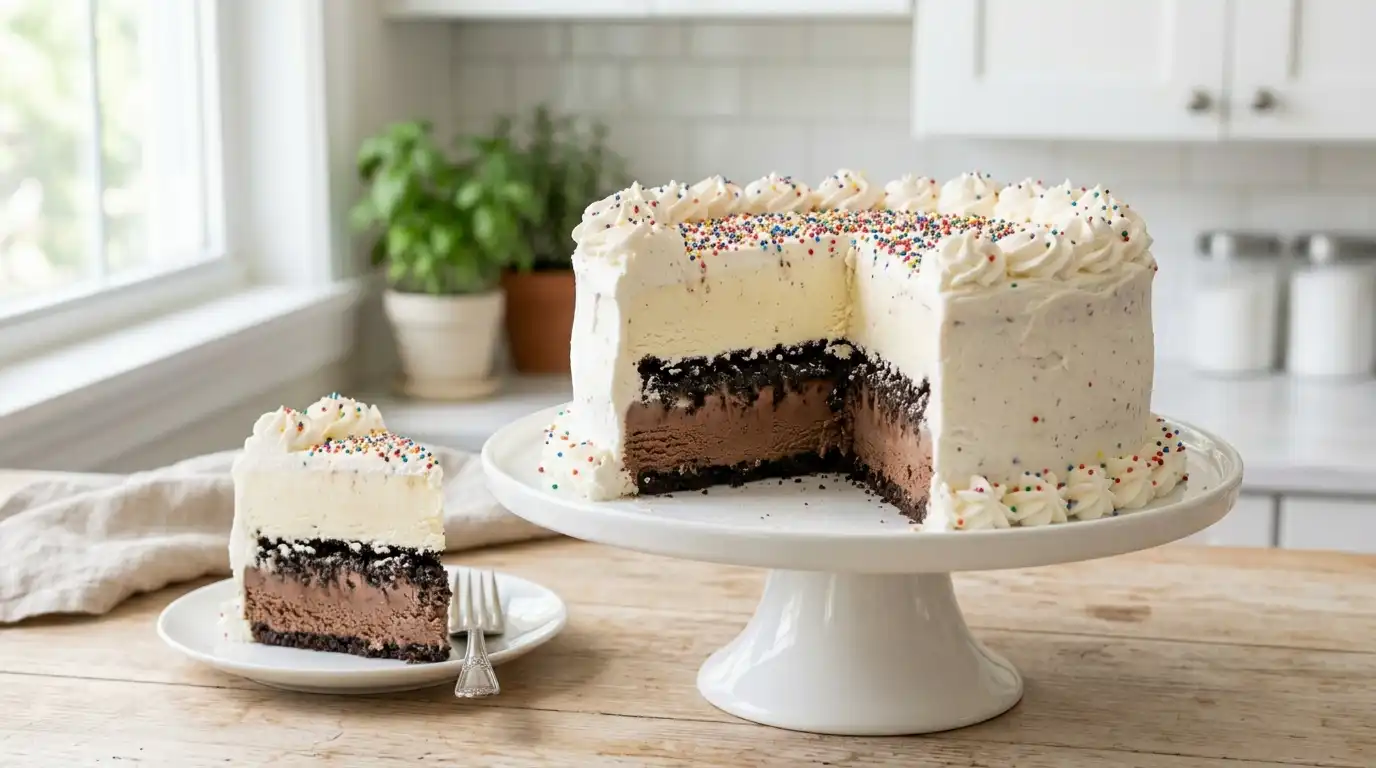
Copycat Carvel Ice Cream Cake Recipe With Homemade Crunchies
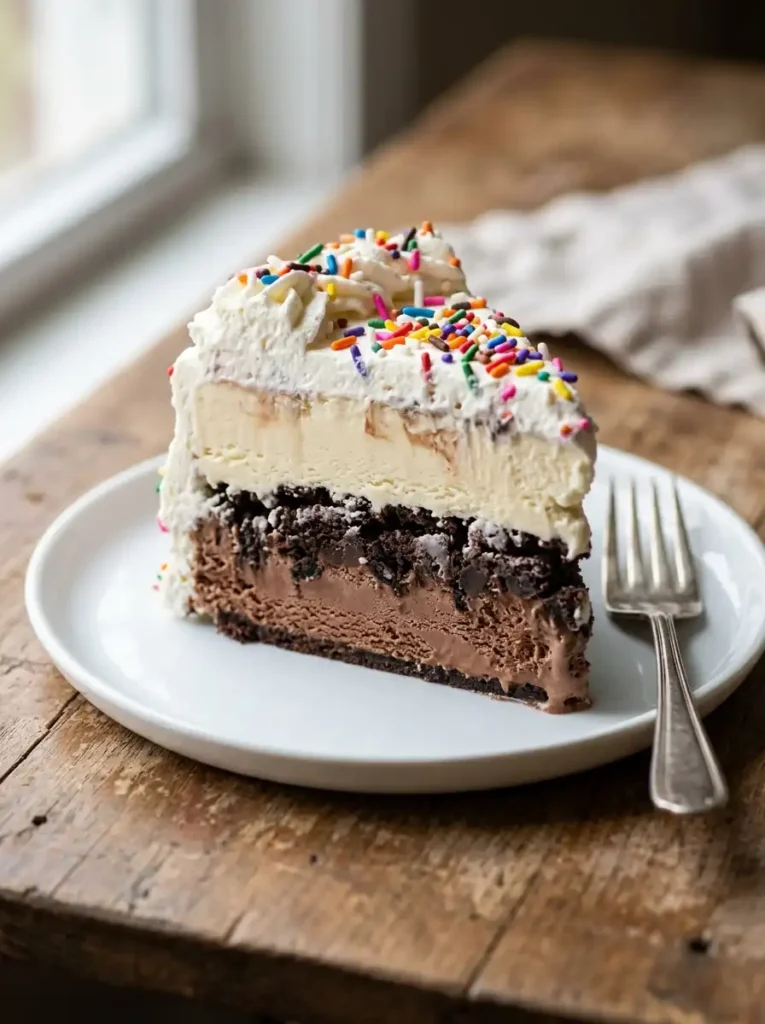
If you love the classic Carvel ice cream cake, this homemade copycat recipe gives you the same nostalgic birthday flavor without needing to run to the store. It has chocolate ice cream, vanilla ice cream, a thick chocolate crunchie center, and fluffy whipped frosting. The middle stays crisp, the layers slice cleanly, and every bite tastes like a frozen celebration.
This homemade Carvel ice cream cake works with store-bought ice cream, but it is even better with a richer homemade base. If you want deeper flavor, start with your own chocolate and vanilla base using our guide on how to make homemade ice cream. If you do not have a machine, use the no-churn method from our guide on how to make ice cream without an ice cream maker so the cake still freezes creamy and smooth.
Recipe at a Glance
- Prep time: 25 minutes
- Freeze time: 6 hours minimum, overnight is best
- Servings: 12 slices
- Best pan: 9-inch springform pan
- Difficulty: Easy
- Best for: birthdays, summer parties, family desserts, make-ahead celebrations
Why This Carvel Ice Cream Cake Works
A great Carvel ice cream cake is all about contrast. Soft chocolate and vanilla ice cream need a crunchy center, not a soggy cookie layer. The whipped frosting should taste light, but it must be stable enough to survive the freezer. This recipe fixes the common homemade problems by freezing the crunchies before layering, chilling the pan, and letting each layer firm up before adding the next.
The best part is control. You can make the crunchie layer thicker, choose premium ice cream, adjust the sweetness, and decorate the cake for any occasion. Store-bought ice cream cakes are convenient, but a homemade Carvel ice cream cake can taste fresher, cleaner, and more personal.
Ingredients You Need
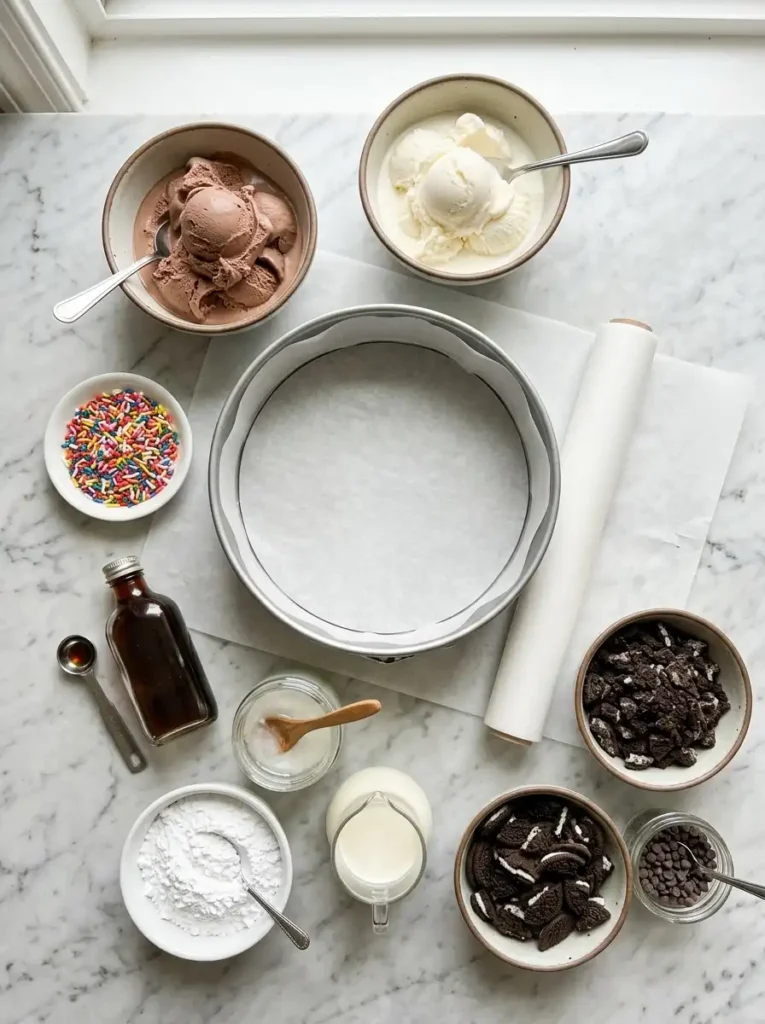
For the cake layers, use 1.5 quarts of chocolate ice cream and 1.5 quarts of vanilla ice cream, both slightly softened. If you want a stronger bakery flavor, add 1 tablespoon of vanilla extract to the vanilla layer before spreading it. Choose dense ice cream rather than airy ice cream because dense ice cream freezes smoother and cuts better.
For the crunchies, use 22 chocolate sandwich cookies or chocolate wafer cookies, 1 cup chocolate chips, 1/3 cup coconut oil, and a pinch of salt. If you like cookie-based desserts, the texture idea is similar to the crunchy cookie base in our Oreo cheesecake recipe, but here we freeze the crumbs into chocolate clusters so they stay crisp inside the ice cream.
For the frosting, use 2 cups very cold heavy whipping cream, 1/2 cup powdered sugar, 1 teaspoon vanilla extract, and optional gelatin for stability. Whipped cream gives this Carvel ice cream cake the most classic frozen texture. If you prefer a more decorated bakery finish, use a very thin layer of homemade buttercream frosting, but keep it light so the cake stays easy to slice.
How to Make Carvel-Style Chocolate Crunchies
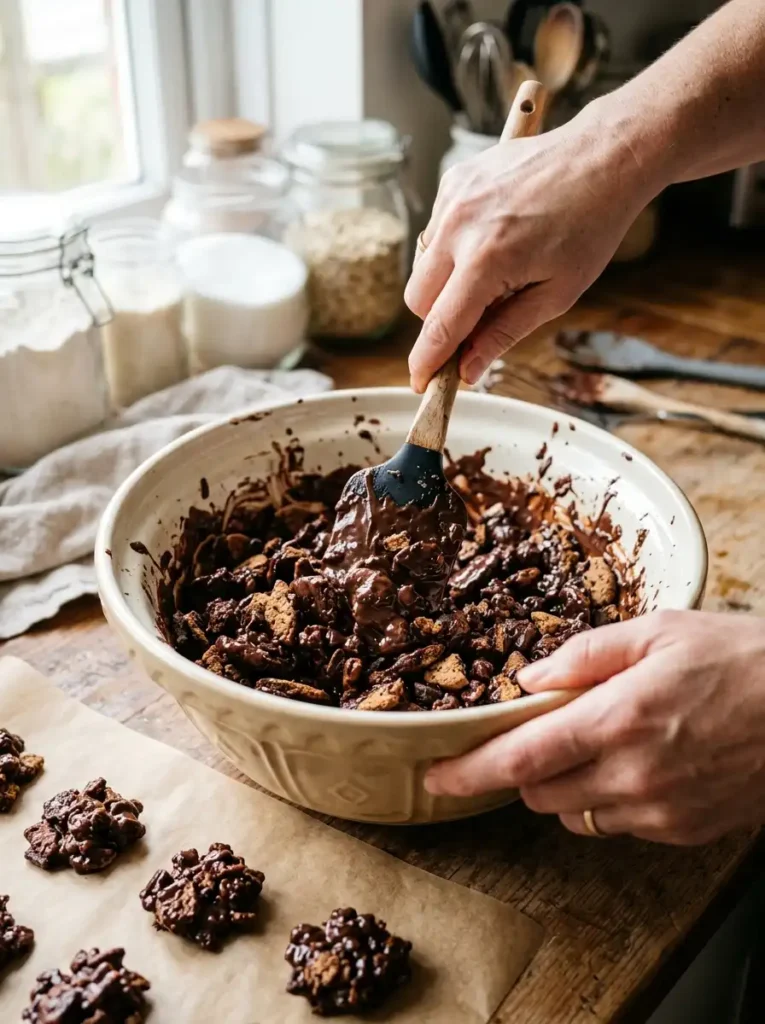
Crush the cookies into small pieces, not powder. Small crumbs slice cleanly, but they still need texture. Melt the chocolate chips with coconut oil in 20-second microwave bursts, stirring until smooth. Add a pinch of salt, then pour the chocolate mixture over the crushed cookies.
Spread everything on a parchment-lined tray and freeze for 10 minutes. Once firm, break it into small clusters. This step is what makes the homemade Carvel ice cream cake better than many copycat versions because the crunchies stay crisp instead of dissolving into the ice cream. If you already have chocolate shell topping, you can mix it directly with crushed cookies and freeze it before layering.
Step-by-Step Instructions
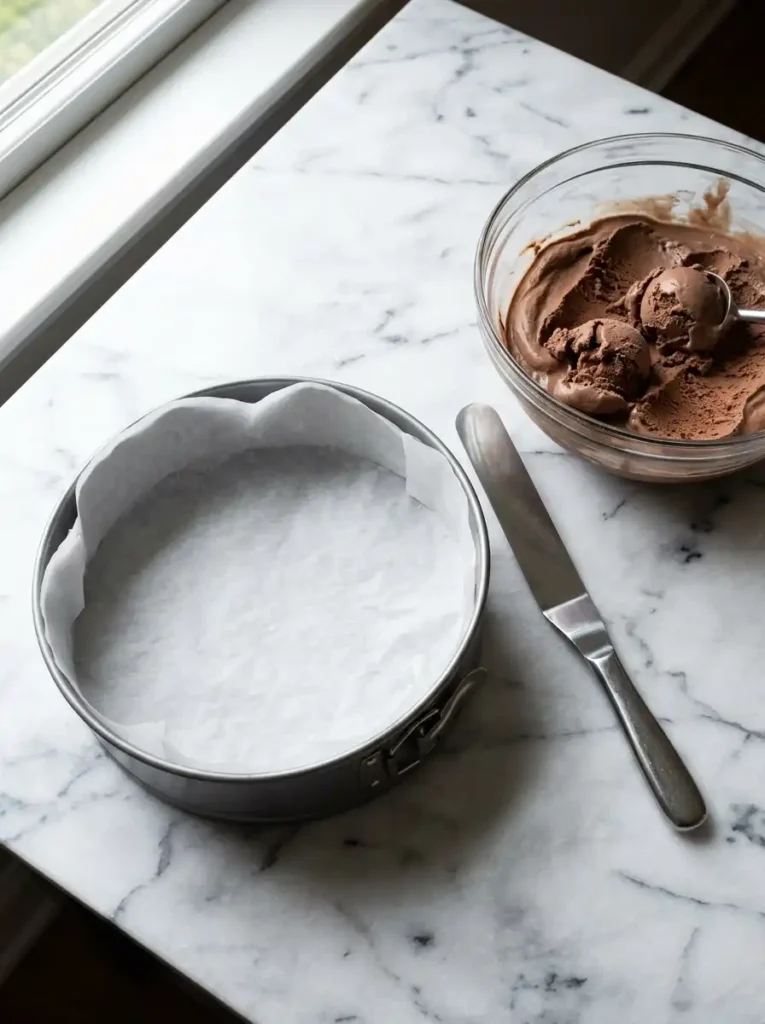
1. Prepare the pan
Line the bottom of a 9-inch springform pan with parchment paper. Add a strip of parchment or acetate around the inside wall for clean sides. Place the pan in the freezer for 15 minutes before building your Carvel ice cream cake.
2. Add the chocolate ice cream
Let the chocolate ice cream soften for 8 to 12 minutes. It should be spreadable, not melted. Spoon it into the chilled pan and smooth it into an even layer. Freeze for 30 to 45 minutes, or until firm.
3. Add the crunchies
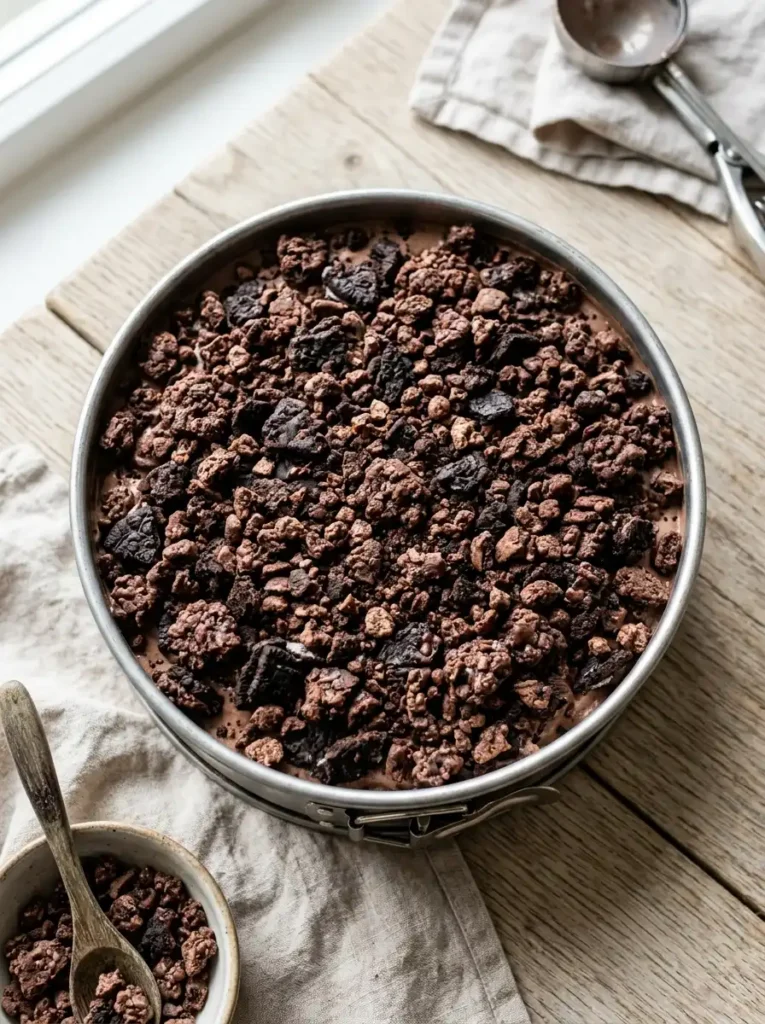
Sprinkle the frozen chocolate crunchies over the chocolate layer. Leave a small border around the edge so the cake slices neatly. Press gently so the crunchies attach without sinking.
4. Add the vanilla ice cream
Soften the vanilla ice cream and spread it over the crunchies. Smooth the top with an offset spatula. Cover tightly with plastic wrap and freeze for at least 6 hours. Overnight gives the cleanest Carvel ice cream cake slices.
5. Make the whipped frosting
If using gelatin, sprinkle it over cold water and let it bloom for 5 minutes. Microwave for 5 to 8 seconds until liquid, then cool slightly. Beat cold heavy cream, powdered sugar, and vanilla until soft peaks form. Drizzle in the gelatin and beat to firm peaks.
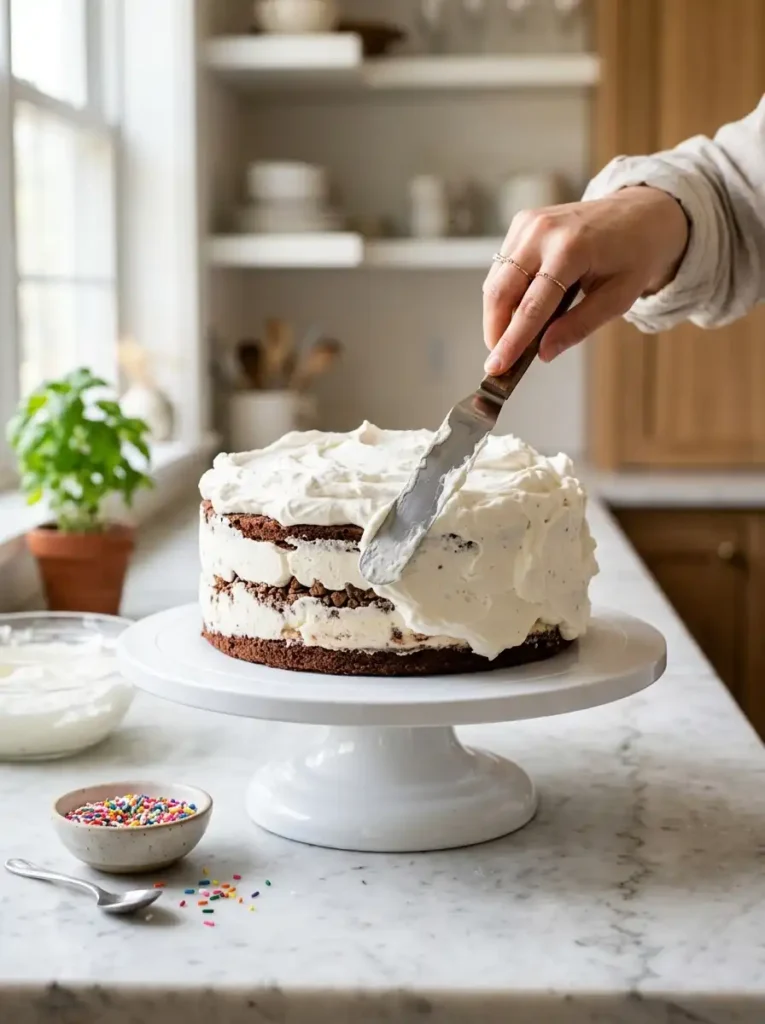
6. Frost and decorate
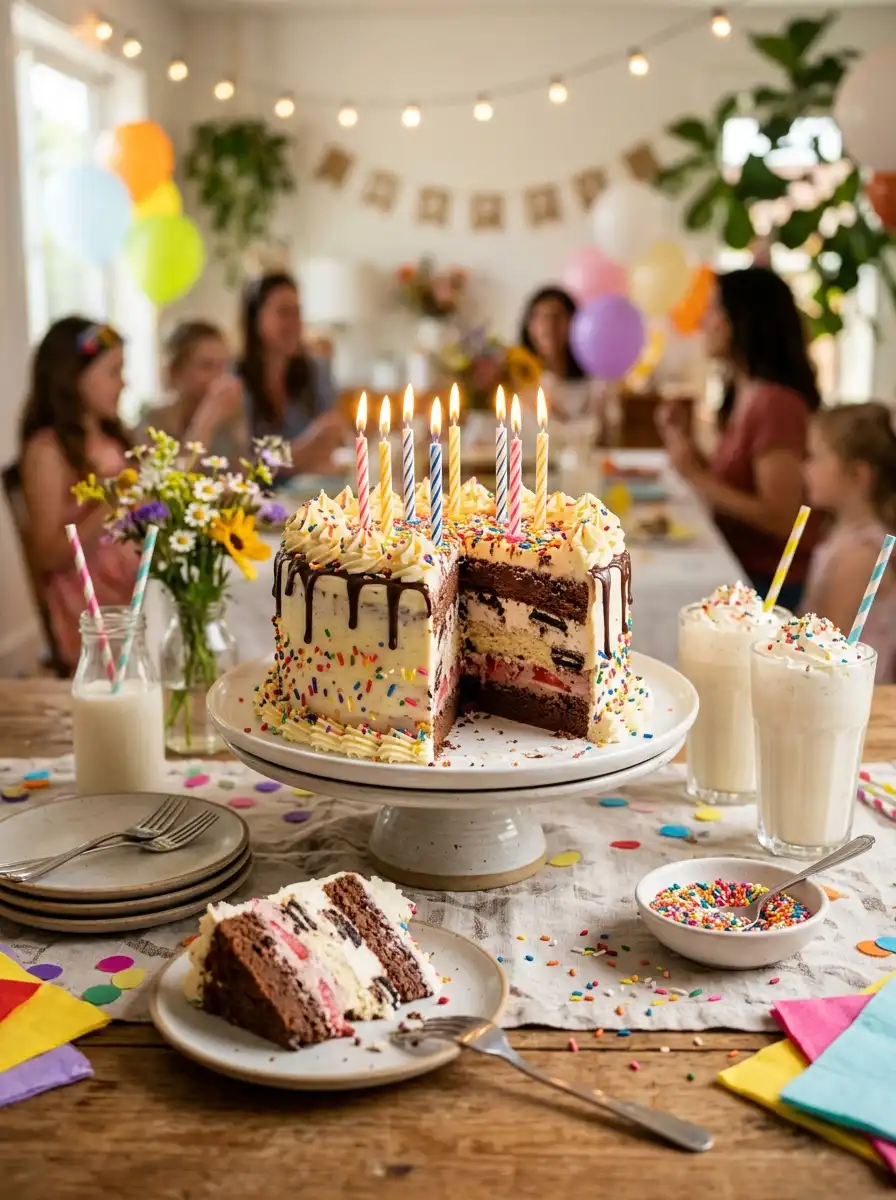
Remove the cake from the springform pan. Spread whipped frosting over the top and sides. Add sprinkles, cookie crumbs, or a blue border for a classic party look. Freeze for 30 to 60 minutes before slicing.
Serving Tips for Clean Slices
Take the Carvel ice cream cake out of the freezer 10 to 15 minutes before serving. Dip a sharp knife in hot water, wipe it dry, and slice. Repeat between cuts. This keeps the layers sharp instead of crushed.
For a frozen dessert table, pair this cake with a quick homemade milkshake, especially if you are serving kids or birthday guests. If you want another creamy frozen dessert on the table, strawberry cheesecake ice cream adds a fruity contrast to the chocolate crunchies.
Store-Bought vs Homemade Ice Cream Cakes
Sometimes you need a cake fast. If you are searching for ice cream cakes near me, ice cream cake near me, or even ice cake near me, check grocery bakery freezers, local ice cream shops, delivery apps, and brand product locators. If your question is where can I get an ice cream cake, nearby supermarkets are usually the fastest option, while ice cream shops are better for custom writing or decorations.
But if you have time, homemade wins on texture and flavor. A homemade Carvel ice cream cake lets you add more crunchies, use better ice cream, and avoid the overly sweet taste that some freezer aisle ice cream cakes have.
Easy Variations
For a cookies-and-cream version, use cookies-and-cream ice cream for the vanilla layer and add extra cookie crumbs on top. For a chocolate lover’s version, use chocolate ice cream for both layers and drizzle fudge over the crunchies.
If you need a gluten-free version, use certified gluten-free chocolate sandwich cookies and gluten-free ice cream. This is the safest way to make a gluten-free Carvel ice cream cake at home. For more celebration ideas without gluten, our gluten free birthday cake guide is useful when planning a full dessert table.
For a colorful birthday cake style, use vanilla ice cream, rainbow sprinkles, and a little cake batter extract. If you like fun party cakes with chocolate and vanilla patterns, homemade zebra cakes are another good dessert to serve beside ice cream cakes.
You can also add a thin vanilla cake layer between the ice cream layers for a softer cake-shop texture. If you want a shortcut, our French vanilla cake mix recipe works well because the crumb stays moist even after chilling.
Storage Tips
Keep the Carvel ice cream cake covered in the freezer for up to 1 week for the best texture. Press plastic wrap directly against exposed cut sides before returning leftovers to the freezer.
Do not leave the cake at room temperature for more than 20 minutes. Once ice cream melts too much, refreezing can make it icy.
Troubleshooting
My crunchies turned soft. The cookies were crushed too fine, or the chocolate mixture was warm. Freeze the crunchies before layering.
My cake is too hard to cut. Let it sit for 10 to 15 minutes and use a hot knife.
The ice cream melted while assembling. Freeze each layer before adding the next. A chilled pan helps a lot.
The whipped cream cracked. It may be overbeaten or spread on a rock-hard cake. Let the cake stand for 3 minutes before frosting.
FAQ
What are Carvel-style crunchies made of?
They are made by combining chocolate cookie crumbs with a chocolate coating. In this recipe, cookies, chocolate chips, coconut oil, and salt create a crisp shell-like crunch.
Can I make a Carvel ice cream cake without an ice cream maker?
Yes. The easiest method is store-bought ice cream. You can also use a no-churn base made with whipped cream and sweetened condensed milk.
Is Carvel ice cream cake gluten-free?
Many classic ice cream cakes contain cookie crunchies or wheat-based ingredients, so they are not always gluten-free. For a gluten-free homemade version, use certified gluten-free cookies and check every ice cream label.
How far ahead can I make this Carvel ice cream cake?
Make it 2 to 3 days ahead for best results. Frost it the day before serving so it looks fresh.
What is the best ice cream for this recipe?
Use dense, high-quality ice cream. Very airy ice cream melts quickly and refreezes with a weaker texture.
Final Thoughts
This copycat Carvel ice cream cake is easy, nostalgic, and better than most store-bought ice cream cakes because you control the crunch. Freeze each layer, keep the crunchies crisp, and let the finished cake firm up before slicing. Whether it is for a birthday or a weekend dessert, this is the kind of frozen cake that disappears fast.
Copycat Carvel Ice Cream Cake Recipe With Homemade Crunchies
Ingredients
Equipment
Method
- Line the bottom of a 9-inch springform pan with parchment paper. Add a strip of parchment or acetate around the inside wall for clean sides. Place the pan in the freezer for 15 minutes.
- Crush the chocolate cookies into small pieces, not fine powder. Add the chocolate chips and coconut oil to a microwave-safe bowl. Microwave in 20-second bursts, stirring between each, until smooth. Stir in the salt, then mix with the crushed cookies.
- Spread the chocolate cookie mixture on a parchment-lined tray and freeze for 10 minutes. Once firm, break it into small crunchy clusters.
- Let the chocolate ice cream soften for 8 to 12 minutes. It should be spreadable, not melted. Spoon it into the chilled springform pan and smooth it into an even layer. Freeze for 30 to 45 minutes, or until firm.
- Sprinkle the frozen chocolate crunchies over the chocolate ice cream layer. Leave a small border around the edge so the cake slices neatly. Press gently so the crunchies attach without sinking.
- Soften the vanilla ice cream and spread it over the crunchies. Smooth the top with an offset spatula. Cover tightly with plastic wrap and freeze for at least 6 hours, or overnight for the cleanest slices.
- If using gelatin, sprinkle it over cold water and let it bloom for 5 minutes. Microwave for 5 to 8 seconds until liquid, then cool slightly.
- Beat the cold heavy cream, powdered sugar, and vanilla until soft peaks form. If using gelatin, slowly drizzle it in and continue beating until firm peaks form.
- Remove the cake from the springform pan. Spread whipped frosting over the top and sides. Decorate with sprinkles, cookie crumbs, or a classic border.
- Freeze the decorated cake for 30 to 60 minutes before slicing. For clean slices, let the cake sit at room temperature for 10 to 15 minutes and cut with a hot, dry knife.