Graham Cracker Crust Recipe (Buttery, Crisp & Never Crumbly)
The only graham cracker crust recipe you’ll ever need — 3 simple ingredients, ready in 15 minutes, and works perfectly for both baked pies and no-bake cheesecakes. I’ll also show you the exact trick that stops it from crumbling when you slice it.
There is one base that quietly holds together half the desserts worth making: a good graham cracker crust recipe. It’s the buttery, golden, slightly sweet foundation under every great cheesecake, key lime pie, and no-bake dessert — and the difference between a homemade one and a sad, stale store-bought shell is night and day.
The problem? Most crusts crumble the second you cut into them, or turn out so hard you need a chisel. After testing this dozens of times for my cheesecakes, I dialed in the exact ratio that gives you a crust that’s crisp, holds its shape, slices cleanly, and tastes incredible. This graham cracker crust recipe is how to make graham cracker crust the right way, once and for all.
Table of Contents
Why You’ll Love This Graham Cracker Crust Recipe
- Only 3 ingredients you already have in the kitchen.
- Ready in 15 minutes — faster than driving to the store.
- Bake or no-bake — one recipe, both methods explained below.
- Never crumbly. The butter-to-crumb ratio is tested to hold a clean slice.
- Endlessly flexible — works for pies, bars, and every cheesecake you’ll ever make.
Skip the boxed crusts. They’re loaded with corn syrup, they taste like cardboard, and homemade beats them in every single way for the same price.
Ingredients You’ll Need
This is the beauty of a homemade graham cracker crust recipe — three things, no special equipment.
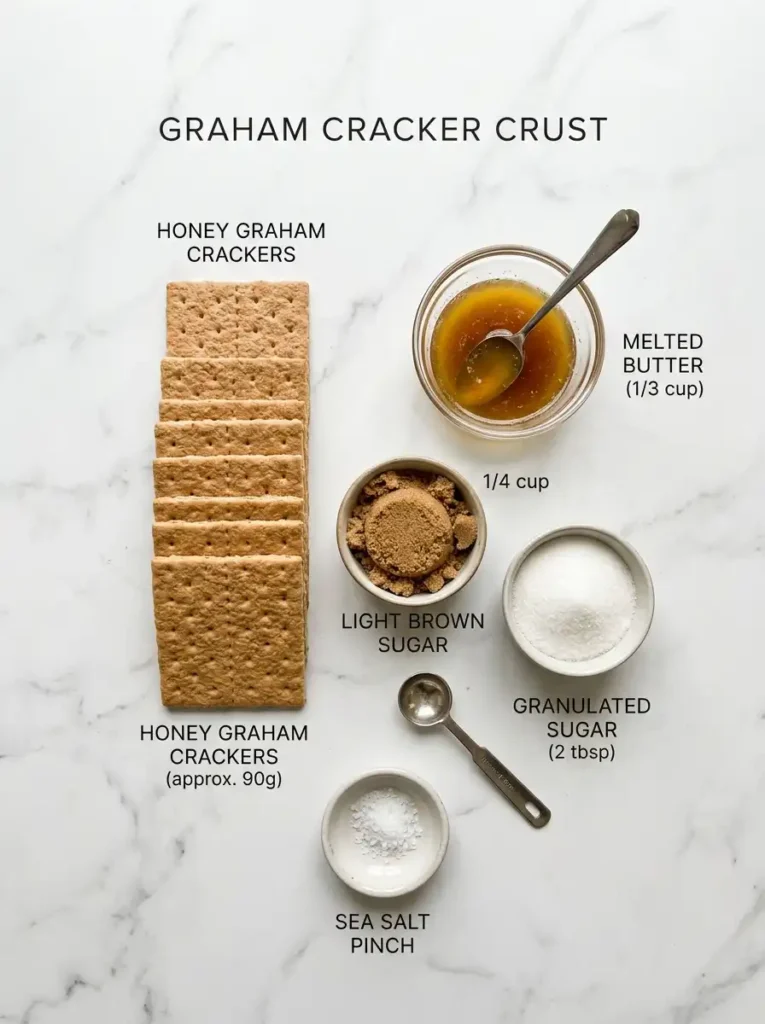
- Graham crackers — 12 full sheets, crushed into about 1½ cups (180g) of fine crumbs. You can also buy pre-made graham cracker crumbs in the baking aisle. No graham crackers where you live? Digestive biscuits work perfectly.
- Butter — 6 tablespoons (85g), melted. This is the glue. I prefer salted butter here because a pinch of salt balances all that sweetness.
- Sugar — ⅓ cup (67g). I use a mix of granulated and brown sugar. The brown sugar adds a deeper, almost caramel note you’ll never get from a store-bought shell.
Pro tip: A pinch of cinnamon (¼ tsp) in the crumbs makes the whole kitchen smell like a bakery and pairs beautifully with creamy fillings.
How to Make Graham Cracker Crust (Step by Step)
Follow these four steps and this graham cracker crust recipe comes together in minutes.
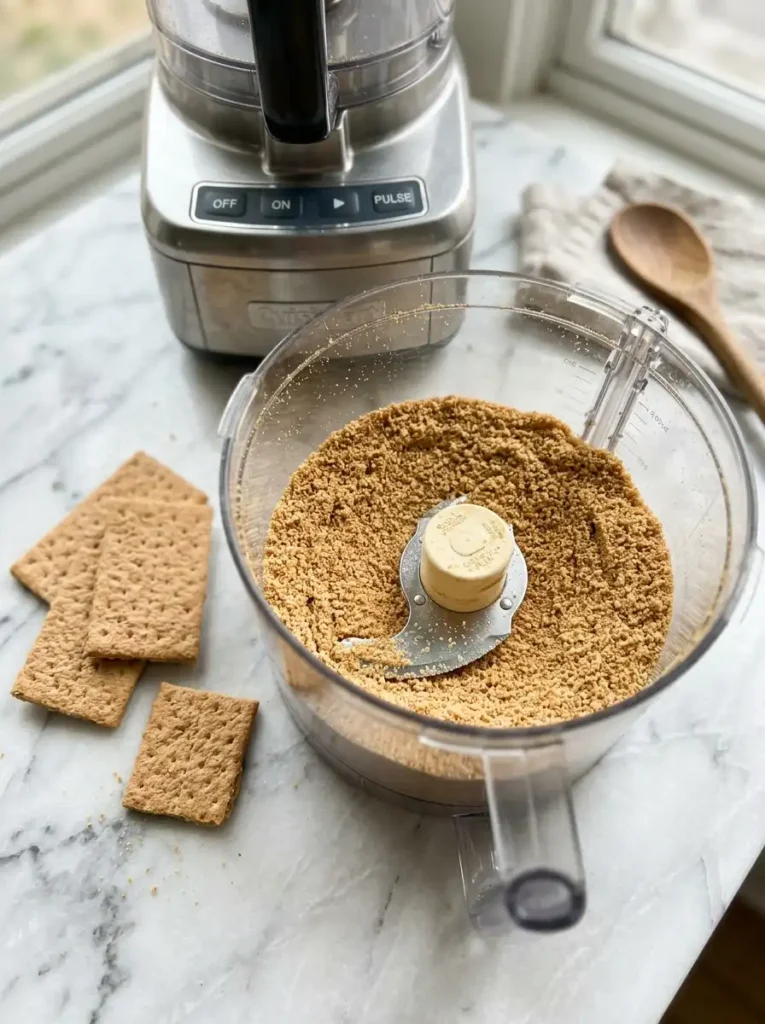
Step 1 — Crush the crackers
Pulse the graham crackers in a food processor until you have fine, sandy crumbs. No food processor? Drop them in a zip-top bag and crush with a rolling pin. Fine and even is the goal — big chunks are the #1 reason crusts fall apart.
Step 2 — Mix
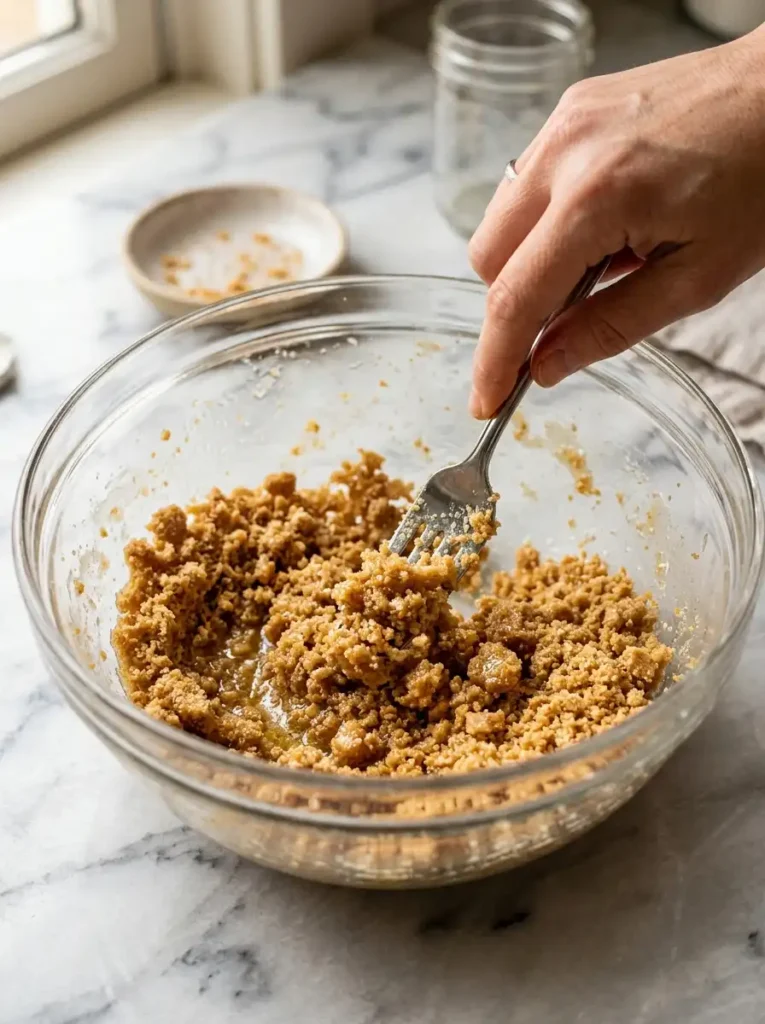
Stir the crumbs and sugar together in a bowl, then pour in the melted butter. Toss with a fork until every crumb is moistened. The texture should look like wet sand and hold together when you squeeze a handful.
Step 3 — Press firmly
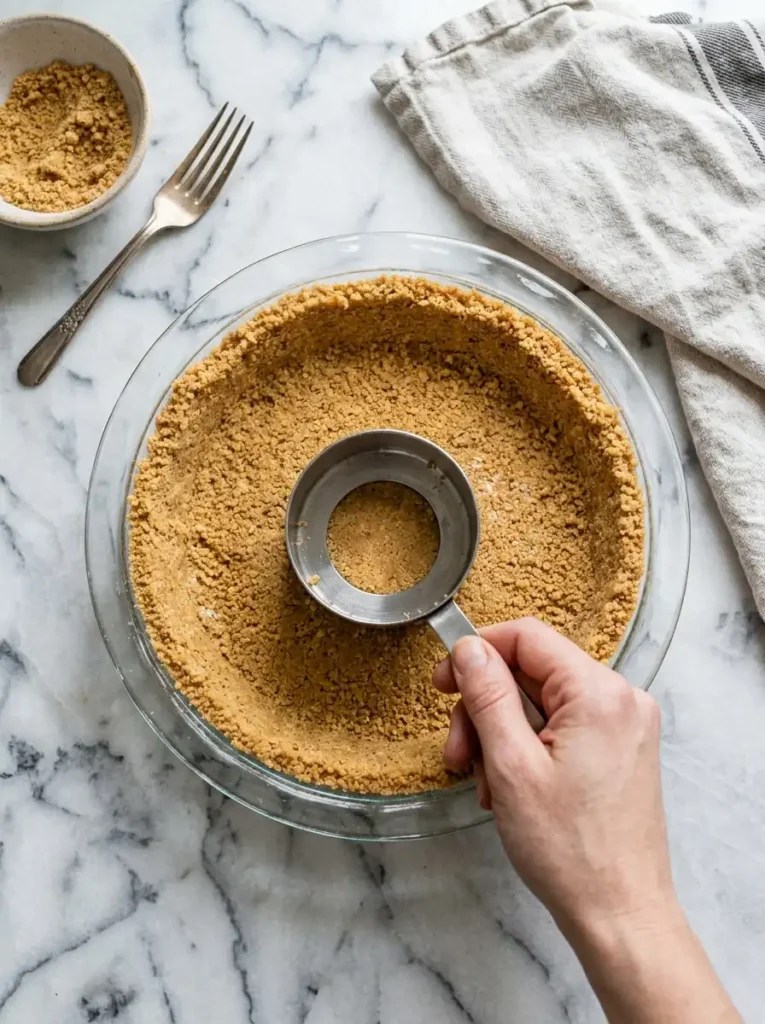
Tip the mixture into a 9-inch pie plate or springform pan. Press it tightly and evenly across the bottom and up the sides. Use the flat bottom of a measuring cup or a drinking glass to pack it down — the firmer you press, the better it holds. This single step decides whether your slices come out clean.
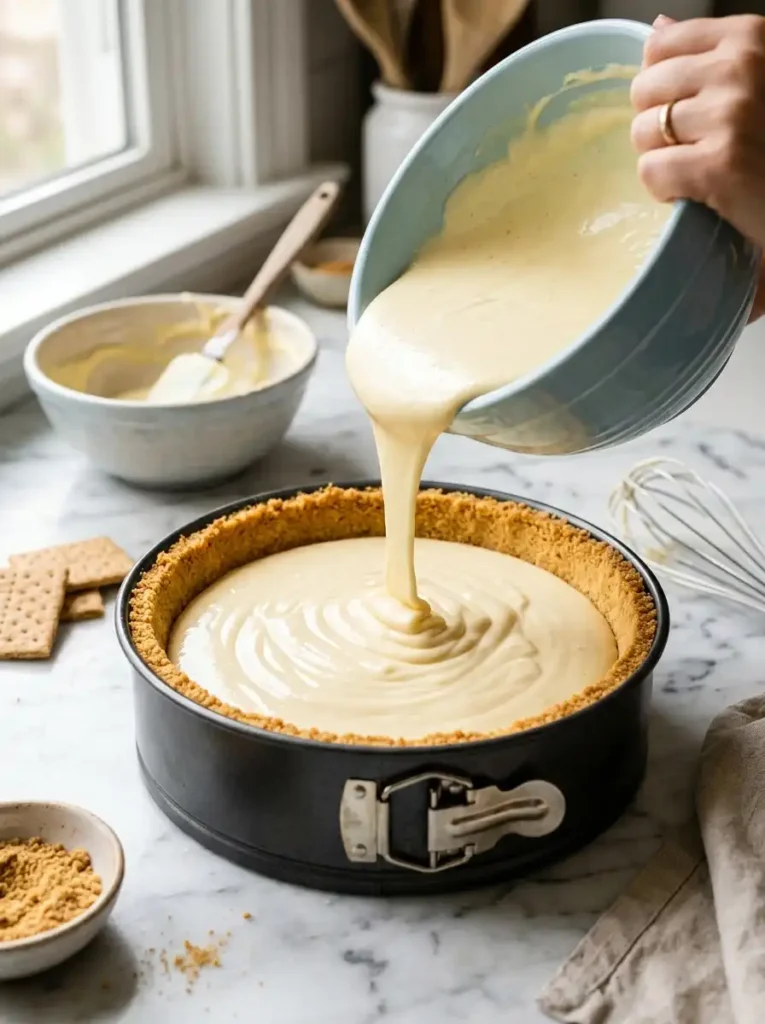
Step 4 — Bake or chill
- To bake: Bake at 350°F (175°C) for 10 minutes, until fragrant and lightly golden. Cool completely before adding any filling.
- No-bake: Skip the oven. Chill in the fridge for at least 1 hour (or the freezer for 20 minutes) so the butter firms up and locks the crust together.
That’s it. From here it’s ready for whatever filling you’ve got planned.
Baked vs. No-Bake: Which Should You Use?
The method depends on your filling, not on preference.
- Bake the crust when your filling also gets baked (like a classic cheesecake) or when you want maximum crispness. Baking sets the butter and sugar into a sturdier, crunchier shell.
- Go no-bake when your dessert is no-bake — think no-bake cheesecake, key lime, or icebox pies. The fridge does the binding instead of the oven.
When in doubt, bake it. A baked crust is almost always sturdier and slices more cleanly.
The #1 Reason Your Crust Crumbles (and How to Fix It)
Most graham cracker crust recipes skip this part, so here’s the honest troubleshooting guide that makes this graham cracker crust recipe foolproof:
- Too crumbly / falls apart? Not enough butter, or you didn’t press hard enough. The mix must clump when squeezed. Add 1 more tablespoon of melted butter and pack it down firmly.
- Too hard / tough? Too much butter or over-baked. Stick to 6 tablespoons and pull it at 10 minutes.
- Soggy bottom? Your filling was too wet or the crust wasn’t fully cooled. Always cool a baked crust completely before filling.
- Crumbs too coarse? Big pieces won’t bind. Grind them fine — this matters more than anything.
Get the butter ratio and the pressing right, and a crumbly crust becomes a thing of the past.
Easy Variations
One recipe, endless options:
- Graham cracker pie crust: This same recipe is exactly how to make graham cracker pie crust — just press it into a pie plate and bake. Perfect under cream pies and fruit pies.
- Gluten-free: Swap in gluten-free graham crackers or crumbs, 1:1.
- Vegan: Use vegan graham crackers and a plant-based butter.
- No graham crackers: Vanilla wafers, gingersnaps, or digestive biscuits all work.
- Chocolate crust: Use chocolate graham crackers for a richer base under chocolate or peanut butter fillings.
No matter which version you choose, the base graham cracker crust recipe ratio stays exactly the same.
What to Make With Your Graham Cracker Crust
This is where the magic happens. A great cheesecake crust turns a good dessert into an unforgettable one. Once your graham cracker crust recipe is ready, try it under one of these reader favorites:
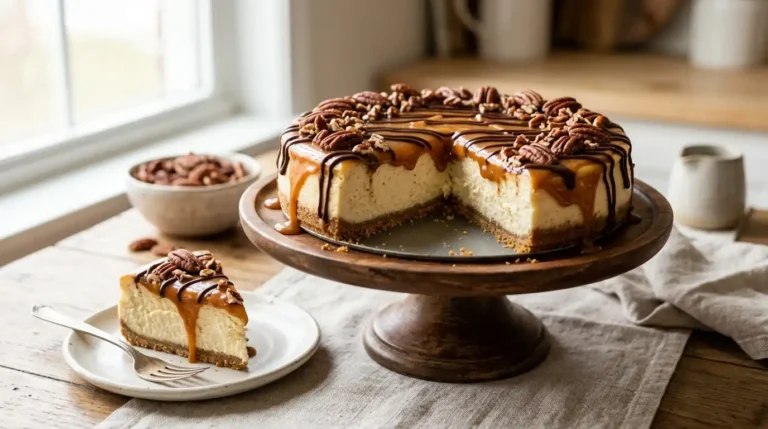
- 🐢 Turtle Cheesecake — caramel, chocolate, and pecans on a buttery graham base.
- 🍓 Strawberry Cake and Cheesecake — a layered showstopper.
- 🥧 Baklava Cheesecake — for a crispy, nutty twist.
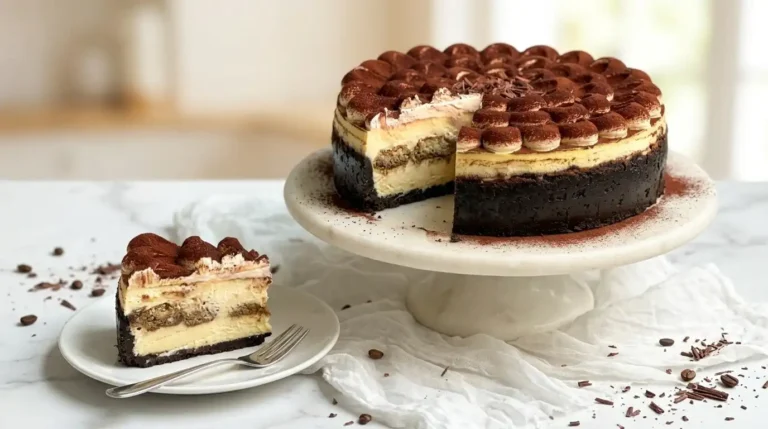
- ☕ Tiramisu Cheesecake — espresso, mascarpone, and cocoa.
Want to finish things off? A drizzle of cream cheese glaze or a swirl of homemade crema chantilly takes any of these over the top.
Make-Ahead & Storage
- Make ahead: Keep the prepared crust (baked or unbaked) at room temperature or in the fridge for 1–2 days before filling.
- Freeze: Wrap tightly and freeze baked or unbaked crusts for up to 3 months. Thaw before using.
Recipe Card
Graham Cracker Crust
Prep: 5 min · Cook: 10 min · Total: 15 min · Yields: one 9-inch crust
Ingredients
- 1½ cups (180g) graham cracker crumbs (about 12 full sheets)
- ⅓ cup (67g) sugar (granulated, or half brown sugar)
- 6 tablespoons (85g) salted butter, melted
Instructions
- Preheat oven to 350°F (175°C) if baking.
- Crush graham crackers into fine crumbs.
- Stir crumbs and sugar together, then mix in melted butter until it resembles wet sand.
- Press firmly into a 9-inch pie plate or springform pan, bottom and up the sides.
- Baked: Bake 10 minutes, then cool completely. No-bake: Chill at least 1 hour before filling.
Nutrition (per slice, 1/12): ~155 cal · 9g fat · 17g carbs · 1g protein
Frequently Asked Questions
How many graham crackers do I need for a crust?
About 12 full sheets, which makes roughly 1½ cups of crumbs — enough for one 9-inch crust.
Do I have to bake a graham cracker crust?
No. Bake it for a crisper, sturdier crust, or chill it in the fridge for at least an hour for no-bake desserts.
Why does my graham cracker crust fall apart?
Almost always too little butter or not pressing it firmly enough. With this graham cracker crust recipe the mixture should clump when squeezed, and you should pack it down hard with a measuring cup.
Can I make a graham cracker pie crust the same way?
Yes — this is exactly how to make graham cracker pie crust. Just press it into a pie plate and bake before adding your filling.
Can I use this crust for cheesecake?
Absolutely. This is the ideal cheesecake crust — bake it for 10 minutes, cool it, then add your cheesecake filling and bake as your recipe directs.
Made this graham cracker crust recipe? Leave a ⭐⭐⭐⭐⭐ rating and a comment below — it helps other bakers find the recipe!

Graham Cracker Crust Recipe
Ingredients
Equipment
Method
- Preheat your oven to 350°F (175°C) if you plan to bake the crust.
- Crush the graham crackers in a food processor until you have fine, sandy crumbs. (Or place them in a zip-top bag and crush with a rolling pin.)
- In a bowl, stir the crumbs and sugar together, then pour in the melted butter. Toss with a fork until the mixture looks like wet sand and holds together when squeezed.
- Tip the mixture into a 9-inch pie plate or springform pan. Press firmly and evenly across the bottom and up the sides, using the flat bottom of a measuring cup to pack it down.
- To bake: Bake for 10 minutes, until fragrant and lightly golden, then cool completely before filling. For no-bake desserts: chill in the fridge for at least 1 hour (or freezer for 20 minutes) before adding your filling.
Notes
• Freezing: Wrap tightly and freeze baked or unbaked crusts for up to 3 months. Thaw before using.
• No graham crackers? Digestive biscuits, vanilla wafers, or gingersnaps all work as a 1:1 swap.
• Gluten-free: Use gluten-free graham crackers or crumbs.
• Vegan: Use vegan graham crackers and plant-based butter.
• The #1 fix for a crumbly crust: add 1 more tablespoon of melted butter and press it down firmly.